Elderflower ‘Champagne’ Sorbet

We sold out of this sorbet in two days at the Bloom festival in Dublin. It turned out really well and was featured in the Irish Times Magazine today, so I thought the least I could do was post a recipe for anyone who might have been disappointed and might wish to make it themselves.

Elderflower ‘champagne’ sorbet is a dessert gourmet enough to wow any foodie friends. Its taste also seems to evoke an emotional response of nostalgia, of foods once tasted and of carefree summers past. Gather friends together over a dish, and the conversation is likely to turn to forgotten memories and sunny days ahead.

I have posted a recipe for elderflower champagne here.

(And, yes, I know I shouldn’t use the term ‘champagne’ for anything not made in that region of France, but elderflower ‘sparkling wine’ sounds really silly!)

Murphys Elderflower Champagne Sorbet

Ingredients:

330 gr sugar
250 ml spring water
500 ml elderflower champagne
75-100 ml lemon juice (to taste)

Yield: 6 Servings

What to do:

1. Boil the water and stir in the sugar, until it is completely dissolved.

2. Cool completely.

3. Stir in the champagne and lemon.

4. Freeze using a domestic ice cream machine, or cover and place in the freezer, stirring at 1 hr intervals to break up the ice.

5. Invite friends over & enjoy!

Technorati tags: 


Elderflower ‘Champagne’

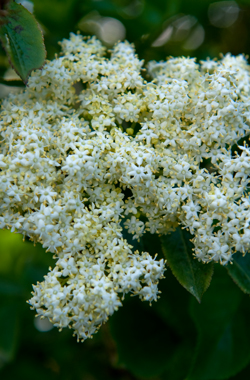
Elderflowers are one of the joys of early summer, and one of the easiest, most delicious and satisfying summer treats is homemade elderflower ‘champagne.’ Creating champagne with nothing but water, sugar, lemon, and a few flowers is magic. It’s also a great excuse for a foraging walk and costs nothing except a bit of time.

The elderflowers need to be free of pesticides and other contaminants, and I find the best containers for fermenting the champagne are plastic sparkling mineral bottles. They are well able for the pressure, but they need to be clean!

Elderflower Champagne

Ingredients:

  • 2.5 litre bucketful of elderflowers
  • 1 lemon
  • 1 kilo sugar
  • 4.5 litre water

Yield: 5 litre bottles

What to do:

  1. Heat the sugar and a litre of water, stirring until the sugar dissolves. Allow to cool.
  2. As soon as possible after picking them, carefully rinse the elderflower heads and place in a clean, 6 litre bucket or pot.
  3. Pour in the rest of the water.
  4. Stir in the cooled sugar syrup.
  5. Cut the lemon, squeeze in the juice, then put in the lemon as well.
  6. Cover with a clean cloth, and leave for 2 days, stirring occasionally.
  7. After two days, strain away the flowers and lemon and pour into clean, empty mineral bottles. Cap them tightly.
  8. Leave the bottles for two weeks. If there is any sign of bulging, open the cap to release the pressure; then reseal.
  9. Enjoy!

Note: I have only made this once, and it came out perfect – fully carbonated, nicely alcoholic, and very tasty. I opened one bottle every few days and tasted it, just to see how it was coming along, and I recommend you do the same. If you try this recipe, I’d love feedback!

Technorati tags: 

Sara’s Salted Peanut and Caramel Sundae

A few days ago, we were playing with sundaes in our Dingle shop. We reached the stage where our bellies were groaning from all the tasting, when Sara (wearing green hat in photo below, with Claire), who happened to be working that day, piped up and said, “Yeah, those are good. But do you want to taste something amazing? It’s a peanut sundae with honeycomb ice cream.”

I politely said, “Please make one for us,” even though I was thinking, “I couldn’t really eat another bite of a sundae. And peanut? Hmmm. Doesn’t sound great. Where’s the subtlety in peanuts? Where’s the panache? Besides, it doesn’t have chocolate in it.”

Of course the last bit is my personal criteria for any dessert, even though I try to be open minded and make sure we offer all sorts of things in our shops. After all, I’ve been reliably informed that there actually are people out there who don’t always choose the chocolate option on the dessert menu.

Anyway, Sara waltzed off to the shop for some peanuts, whipped up the sundae, and presented it in front of us. In went tentative spoons, and all I can say upon tasting it is that Sean, Niamh and myself all had one of those transcendent moments where you think you’ve never tasted anything so amazing in your whole life. We couldn’t even speak. Our full bellies forgotten, we just ate until every last bit of it was gone.

I don’t know why it is so good. There’s nothing really special in it. There’s no secret ingredient or bit of culinary whizz bang. Whatever way the peanut, cream and the caramel meld, both in terms of taste and consistency is simply amazing.

Believe me, this will be on our menus very soon…

Thanks, Sara!

Technorati tags: 

Very Minty Milkshake for Paddy’s Day

St. Patrick’s Day is just around the corner, and if you want a hint of green in your dessert to celebrate, you have a couple options. You could grab a bottle of green food colouring and add it to most any dessert that is light in colour – from whipped cream to vanilla ice cream to creme caramel. It’s effective, but it’s something we would never do at Murphys. We’re stubborn that way, and on point of principle, we never use colouring – natural or otherwise. Of course, that limits the options for a green Patrick’s Day dessert of flavour.

However, it can be done, and the obvious candidates for green flavours are matcha (green tea) or mint. The latter makes an especially tasty milkshake if you are a minty kind of person, and I like mine strong. Blending fresh mint leaves with ice cream and milk makes also creates a pleasing light green hue that gives a nod to the patron saint of Ireland. Here’s how you can do it:

Fresh Very Minty Milkshake

Ingredients (serves 1):

2 scoops vanilla ice cream

1 cup milk.

30 fresh mint leaves (removed from the stalk)

What to do:

1. Put the ice cream, mint and milk in the blender or food processor and allow it to soften for at least two minutes. Blending it straight away will leave lumps of ice cream in the shake.

2. Blend until smooth, on high speed.

3. Garnish with cream and a mint leaf.

4. If you really like mint, add more leaves!

Technorati tags: 

Pink Peppercorn Ice Cream

I love pink peppercorns. They have an amazing flavour – peppery, fruity, complex, and we thought they’d make a great ice cream. Interestingly, pink peppercorns are not actually peppercorns, but rather dried berries from the Baies rose plant. They come from Madagascar, where many great things are grown.

This ice cream is spicy, and frankly it’s a bit confusing on the palate. I think it’s because of the complexity of flavour that reminds one of something and yet is a bit elusive. I’ll give the recipe here, but it’s a bit of a work in progress. We’re thinking of doing another version with strawberry, and I’ll let you know how we get on!

MURPHYS PINK PEPPERCORN ICE CREAM

Ingredients:

• 120g sugar
• 5 egg yolks
• 220 ml cream
• 220 ml milk
• 2 teaspoons ground pink peppercorn

What to do:

1. Beat the sugar and egg yolks and until it thickens and lightens in colour.
2. Bring the milk to a low simmer.
3. Beat the milk into the egg/sugar mixture in a slow stream.
4. Pour the mixture back into the pan and place over low heat.
5. Stir continuously until the custard thickens slightly (around 65-70C) and just coats the back of a spoon. Don’t over-heat, though, because at around 76C you will scramble the eggs!
6. Immediately remove from the heat.
7. Allow to cool.
8. Stir in the peppercorns.
9. Whip the cream until it has doubled in volume (you should have soft peaks – don’t over-whip).
10. Fold (gently stir) in the custard.
11. Freeze using a domestic ice cream machine.
You can also just cover and place in the freezer, stirring every few hours.

Yield: 8 servings

Notes:

1. It’s hard to say how spicy your peppercorns would be, so you might need to add more or less!

2. To pasteurise the eggs, heat the custard to 73C and maintain that temperature for at least 5 minutes. Use a cooking thermometer, though, and keep stirring! If the custard goes any higher than 76C, the eggs will scramble. Immediately cover and place in the freezer until cool.

Technorati tags: 

Ice Cream Cookies

This year, for the Dingle Food and Wine Festival, we’re not going gourmet with some of the unusual flavour arrays we’ve done in the past. Instead, we’re going to do something that’s very delicious and simple – ice cream cookies!

We’ll serve them with a glass of Kerry cow milk that we’ll get straight off our farmer and pasteurise. We’ll also do a mini Kerry cow milkshake.

I hope those of you who make it to the festival enjoy it, and I do hope you’ll make it. It’s really one of the best times to be in Dingle, and there’s certainly no shortage of things to do and eat!

If you want to make these ice cream sandwiches at home, here’s how to do it:

Murphys Ice Cream Cookies

1. Make my chocolate chip cookie recipe (here).

2. Wait until the cookies are cool.

3. Spread a half scoop of vanilla ice cream (we’ll use Kerry cow ice cream, but vanilla is close!) on the flat side of one cookie.

4. Spread a half scoop of chocolate ice cream (or dark chocolate ice cream) on the flat side of a second cookie.

5. Press the two cookies together.

6. Put them in the freezer to harden (if the ice cream is too soft, it will be much harder to eat it).

7. Enjoy!

Technorati tags: 

Sea Salt Ice Cream

Here’s one of our new flavours. I think there are many uses for sea salt ice cream – it can really lift the flavour of a range of desserts, and we’ve brought it in to complement our new caramel and dark chocolate flavours. It’s certainly caught people’s imaginations, and it’s selling better than I would have thought.

It’s a simple recipe to make, but I do have a caution in that various salts can taste so different, so depending on the salt you use, you might well need to adjust the recipe. I don’t think it should be too salty – just enough to boost other flavours.

I made my own sea salt. If you’re near the sea and have the inclination, here’s how I did it.

MURPHYS SEA SALT ICE CREAM

Ingredients:

• 120g sugar
• 5 egg yolks
• 220 ml cream
• 220 ml milk
• 2 teaspoons sea salt

What to do:

1. Beat the sugar and egg yolks and until it thickens and lightens in colour.
2. Bring the milk to a low simmer.
3. Beat the milk into the egg/sugar mixture in a slow stream.
4. Pour the mixture back into the pan and place over low heat.
5. Stir continuously until the custard thickens slightly (around 65-70C) and just coats the back of a spoon. Don’t over-heat, though, because at around 76C you will scramble the eggs!
6. Immediately remove from the heat.
7. Allow to cool.
8. Stir in the salt.
9. Whip the cream until it has doubled in volume (you should have soft peaks – don’t over-whip).
10. Fold (gently stir) in the custard.
11. Freeze using a domestic ice cream machine.
You can also just cover and place in the freezer, stirring every few hours.

Yield: 8 servings

Notes:

1. Again, you may need to adjust the quantity of salt depending on which salt you use. We also really like Maldron salt, but I’d use about 20% less, since it’s saltier than Dingle sea salt!

2. To pasteurise the eggs, heat the custard to 73C and maintain that temperature for at least 5 minutes. Use a cooking thermometer, though, and keep stirring! If the custard goes any higher than 76C, the eggs will scramble. Immediately cover and place in the freezer until cool.

Technorati tags: 

Gingerbread Ice Cream

GingerbreadIceCream2 There are many kinds of gingerbreads out there, and people certainly have their preferences – how dark, how sweet, how spicy. The good news about making gingerbread ice cream is that you can use whatever gingerbread you like, so you’ll definitely like the ice cream! Whether you use gingerbread you have made or gingerbread you have bought, this makes a great festive ice cream. I’ve spiced it up a bit, but you could leave the spices away if you like a plainer ice cream, and simply substitute a bit of vanilla.

MURPHYS GINGERBREAD ICE CREAM

Ingredients:

GingerbreadIceCream3• 120g sugar
• 5 egg yolks
• 220 ml cream
• 220 ml milk
• 1 teaspoon ginger
• 1/4 teaspoon cinnamon
• 100 g gingerbread (broken into small pieces)

What to do:

1. Stir the cinnamon, ginger and sugar together.
2. Add the egg yolks and beat until thick.
3. Bring the milk to a low simmer.
4. Beat the milk into the egg/sugar mixture in a slow stream.
5. Pour the mixture back into the pan and place over low heat.
6. Stir continuously until the custard thickens slightly (around 65-70C) and just coats the back of a spoon. Don’t over-heat, though, because at around 76C you will scramble the eggs!
7. Immediately remove from the heat.
8. Allow to cool.
9. Whip the cream until it has doubled in volume (you should have soft peaks – don’t over-whip).
10. Fold (gently stir) in the custard.
11. Freeze using a domestic ice cream machine, adding the gingerbread when it’s fairly solid.
You can also just cover and place in the freezer, stirring every few hours, and again, add the gingerbread when it’s reasonably solid.

GingerbreadIceCreamYield: 8 servings

Notes:

1. The reason to add the gingerbread at the end is that otherwise it can sink to the bottom of the ice cream as it is freezing and won’t be evenly mixed through it.

2. To pasteurise the eggs, heat the custard to 73C and maintain that temperature for at least 5 minutes. Use a cooking thermometer, though, and keep stirring! If the custard goes any higher than 76C, the eggs will scramble. Immediately cover and place in the freezer until cool.

Technorati tags: